Category Archives: Blog

Beaver Painting Complete

I’m really happy that my taking part in the creative writing master’s program still allowed me enough time to complete my annual holiday card. This year I took a break from the usual panel of the Franklin and Nunu book and decided to go with one of my animal paintings. I’ve pretty much maintained my pace on the smaller paintings, even with the increased focus on the environments. This beaver took me a day to pull the reference images, piece together the Photoshop mockup, complete the charcoal base values, and apply the gel medium. The next day I finished about 90 percent of the washes and drybrushing. I did take a little extra time the following day to push the lighting further (thanks to Nicholas Boyd for the critique) but overall, two days of work seems to be fairly consistent.

On this painting I decided I wanted to depart from my usual cool blue and teal shadows and push a warmer deep red tone to unify the piece. I thought, with the candle light, it would make for a warmer, cozier environment and would pop well against the cool white backlighting from the window.

animal_beaver_painting_150_2016_12_01

Squirrel Painting Complete

I’m getting back to my animal paintings again. This is one of the benefits of having a few projects going on at once. I get to cycle through projects maintaining good interest and energy. When I start to burn out a bit I can shift my attentions onto a different project. This squirrel has been sitting around my studio for months begging me to finish the painting stage. I finished the charcoal on canvas stage a while ago, spray-fixed the work, applied my textured heavy gel and layered on a blue wash as my base. The actual painting was fairly quick, only a few hours, where I washed in more base color and then pushed in more detail and texture with some heavier paint application, dry-brushing a bit to push the peaks of the gel texture.

Now comes the really hard part, figuring out the name of this fellow and how he fits in with the artist’s narrative. I’m starting to get energized about the book again and hopefully, I can find time to devote to it over the next year while I pursue my Masters in Creative Writing. Not sure if it will be possible but we’ll have to see.

animals_squirrel_painting_150_2016_10_11

Cult Member Digital Illustration

Finished another illustration of a cult member for my game. I wanted to get this one done for a game session that is coming up quick. Unfortunately, I don’t know if this one will prove useful as an illustration for the game book but at least I got it done pretty quick. I wanted a creepy feel to this one and felt like the smiling mask is a fairly unnerving look. Seems like I’m in a creepy mood lately. Must be Halloween coming up.

I worked this one up from one of my silhouettes, tweaking the proportions and pose as I went. I built up from grayscale, applying lighting where I needed it based on where I determined my light source to be. I built out the cowl as part of the base form but worked in the rest of the cloak as a layer behind the form. That gave me some flexibility to still work with the form and easily push edge lighting with the dodge tool. It wasn’t entirely accurate with respect to the light source but I felt like I needed a bit of additional definition there. I applied a burlap texture in places to the cloak using a semi-transparent multiply layer to make that vary a little from the rest of the clothes.

The shadow I painted out, darkening closer to the feet, and ran a motion blur filter over it to soften the edges then I burnt in right at the base of the feet for some additional contact shadow.

monsterisland_game_digitalillustration_cultist_2016_10_05

Basilisk Digital Illustration

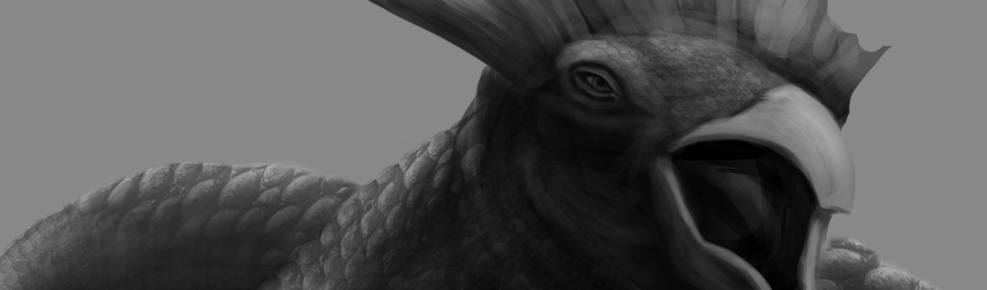
I decided to try some new techniques on this creature and I recorded a video of it start to finish.  In the upcoming days, I hope to complete a voice over for the video so, hopefully, someone can benefit from some of my processes.  I started this basilisk by going to the source, or as close to the source as I could. I pulled up the Wikipedia page on basilisks and read as much as I could regarding the basilisk in literature, pulling any visual references to the look of the creature. There was a fair amount of variation in the written look of the creature but most agreed it was some amalgam of a rooster and a lizard or snake.

I pulled a lot of reference for various types of lizards and roosters and thought back to my description of the creature. In the legends, the creature was able to kill with its gaze but I opted for a more plausible explanation for its powers. I attributed its legendary ability to a coiling, serpentine movement that induces a sensation of vertigo in those viewing it, causing some to be so overcome that they are rendered unconscious. To this end, I decided to give the creature a long thin body with multiple legs and a coiling tail. In designing the creature look for my game, I also opted for a front view so the illustration could also serve as a standing card in game-play.

I started the illustration by sketching out the form, thinking of the dimensions of the creature and drawing from the reference I had collected. Once I had the form pretty well blocked in, I built out a silhouette and determined my light direction. I then began applying light to the form, building up the dimensionality that way. As I went, I selected parts of the form that needed tweaking and used the free transform and warp tool to adjust what I had to make it more to my liking.

Once I got to a place where I was happy with the way the form was looking, I tried a new technique I pieced together from examining other artists works and videos using overlays of photo texture to build out the details of the form a little further. I kept the images light and overlaid the layers as a multiply to keep them building up on top of the values I already had there. I think it turned out pretty well. Initially, I only wanted to apply it in a few places but ended up pushing it in probably more than I ordinarily would have. I might still go back and paint over it in places but, in the interest of time, I’m going to call it as is right now.

monsterisland_game_digitalillustration_basilisk_100_2016_09_31

Zombie Digital Illustration

A little early for Halloween but I had the opportunity to try my hand at a zombie illustration. This one posed some interesting challenges like the tattered remains of clothing. I didn’t think that would be as challenging as it turned out to be but I muddled my way through it. The smudge tool helped there to get the rips moving in the right direction and capturing a little more of the flow of the cloth. I liked the way the ribs turned out but felt that zombie was a little too naked to leave him like that. As you can see there was a fair amount of tweaking the overall proportions and mass. I liked the volume of the original but felt like a more skeletal approach might be nice.

This one is another image for the game I’m developing.  The artwork is going to be the slowest part of getting this to market. While I would love to do a Kickstarter to get this done earlier, raising money for artwork, if I can do a lot of the heavy lifting myself I would love to make this available for cheap. I desperately want to be able to offer the pdf of the rules online for free along with some adventure content to get people interested and playing. Then maybe I can get some feedback beyond my initial playtest group to see how everyone thinks the mechanics are working before committing to a printed version. If the gameplay isn’t there, the rest is all just trappings. So far, my group is liking how everything works but every time I play I find some mechanic I want to simplify or revise.

monsterisland_game_digitalillustration_ghoul_all_150_2016_09_23


Gnome Digital Illustration Stepped Progression

Moving forward from the silhouette stage, I started here adding in more middle values, building out more of the form. One of the first things to determine when approaching this step is where your light sources are. I will start with my primary light source and build the form from there, illuminating parts of the form hit by the light and building in a little reflected or secondary light in the shadow areas so they aren’t completely black. This character was fun as you can see some of the decision making process. Starting with the silhouette, I found that one of my silhouettes, in addition to it being a strong pose, also gave me hints of a face in the varied values so I started there.

monsterIsland_game_digitalIllustration_Gnome_silhouetteFace_2016_09_02

As I began building the form I started with basic functional clothing. I never like designing something that feels like it wouldn’t work. Nothing bothers me more than a warrior with one piece of armor on one shoulder. What’s the point of that? So I designed a partial cowl to heep the rain off his head but not to interfere with his combat prowess. I also liked the idea of keeping the pointy hat element from the traditional gnome. As I kept building, I added in his sword and some belts and pouches. I also amended his proportions, making him wider to make his overall height shorter by comparison while bulking up his frame a bit.

There were also tweaks I had to make to the eye placement, lowering them on the face. This is an important part of the design process. Sometimes you will be working away and won’t notice issues until you take some time to let your eyes adjust and re-set. Coming back to the face with a fresh view let me see that the feature placement was a bit off.

monsterIsland_game_digitalIllustration_Gnome_AuberonSnylinbrungarProgressionForms_2016_09_02

After that, I decided to add in a little more design into the outfit. I pulled some Norwegian costumes to examine their design and started incorporating some of the clothing style there. I found that vests were common and felt that would actually work well with the character. Even though he is harder and darker than the traditional image of a gnome (they probably need warriors as well to defend their lands, right?) I felt like he would still have some sense of style. Then I decided to give him a flaming sword which threw a wrench into the works a bit. That created a new light source so I had to punch up the lighting around the sword as the flames would definitely illuminate the visible areas facing it. So, there is the process on this character. There is always a lot of push and pull and I find I am often having a discussion with the character regarding their needs. Yep.  I talk to my drawings.

monsterIsland_game_digitalIllustration_Gnome_AuberonSnylinbrungarProgression2_2016_09_02


Gnome Digital Illustration Silhouettes

I saved out another stepped progression for an evil gnome I designed for my game. This time, I started with a page of silhouettes. Ordinarily, I would have pushed the silhouettes for more dynamic, active poses but, for purposes of the game, I am creating cards to be used in game-play and find that a more general neutral pose is better suited to those. I pulled some reference for the poses and worked up silhouettes with a rough, textured brush, leaving some room for happy accidents that could be read as accessories or elements of clothing. I tried a few different brushes here and ended up choosing one with a less opaque feel. I hear some artists say they like keeping everything solid black in these but I like keeping some variation in the values as it can suggest things within the form, possibly folds in cloth, items, sometimes even faces as one of these did. One of the other great things about starting with a rough silhouette like this is you have the opportunity to get in there and scale and distort the form to suit your needs. This is something I will play with well into the design.

silhouettes

Gorilla Digital Illustration

This time, I was able to remember to periodically save out files incrementally to document a little of my process when working on this gorilla. You can see the starting sketch through the application of base values and then my applying more detail in some areas. I finished by pushing what I had a bit further with the dodge and burn tools. So one more creature illustration completed for my never ending game project. At the same time that I am working on illustrations, I’m also writing adventures for my testers so I guess, if they are paying attention to my blog, they are getting a glimpse of what is coming at them. Don’t tell them, but this time, it is an army of mind-controlled carnivorous apes. Fun!

monsterIsland_game_digitalIllustration_Gorilla_Progress2_2016_08_16

monsterIsland_game_digitalIllustration_Gorilla_2016_08_17

Bluk the Frogman Digital Illustration

Again I forgot to get a bunch of in-progress steps for my frogman concept.  I did manage to remember once so I have a mid-way image and then the finished design.  I’ll try to do better on the next one I’m working on (I think it will be a gorilla.)  Maybe I’ll set some kind of timer if I can think of it.  So here is one that is about 60-70 percent done and the finished design.  Mid-way working on this one I decided to alter his clothing and accessories a bit.  I gave him a little more armor and some pants, cinched near the bottom to accommodate his leaping, as I expect he is want to do.

MonsterIsland_Bluk_sketch5_72_2016_08_11

Bluk the Frogman sketch

I’m still working on designing my game and sketched out this character with plans to create a digital illustration of him shortly.  I wanted to post the work in progress, though in hopes that I can post more of my process in hopes it might be useful or helpful to someone.  This character was actually written up by my good friend Griff who has been helping me playtest the mechanics of the game along with a few other selfless souls.  He is a tribal shaman with a penchant for cooking.

The image on the left is the original sketch and then I decided I wanted to adjust a few things.  I didn’t like the weight balance in the character and needed to bring the right knee out further to help with the angle of the hips.  I also wanted the guy to be a little heavier and wanted to adjust the head to be less level.  The tweaks I did here were with the free transform tool, the warp, and smudge tool.  Naturally, I wouldn’t do that to artwork unless it was simply a base I planned to work on top of.  I will have to add shadows on the lower parts of the legs to show that bend a little better. I will also probably make tweaks further as I work on the digital.  I’ve been favoring sharper elbows in the silhouettes lately.

MonsterIsland_Bluk_sketch4_72_2016_07_26